As a passionate sim racer, I know that sim racing is not only about driving virtual cars, but also about the overall experience and realism you experience. Fanatical sim racers understand that the excitement lies in the immersion and authenticity of the experience. I am constantly optimising my sim racing setup to make it ever more realistic and immersive. An essential part of this continuous improvement is adding a sim racing roof, which I use to simulate a real racing cockpit.
In this article, I share my personal experiences and insights on the importance of a sim racing roof, how it contributes to the ultimate sim racing experience and take you step-by-step through the process of how I made my sim racing roof.
Creating the Perfect Sim Racing Cockpit
For me, a sim racing setup goes beyond just a steering wheel, pedals and a few screens. It is about creating a complete environment that makes you feel like you are really in a race car. My goal? To build the perfect sim racing cockpit. So I dived into sim racing forums, watched countless YouTube videos and sought out experiences of other fanatics who had already integrated a roof into their setup.
Inspiration I found plenty - from the impressive rig of Race Beyond Matter to the clever design of The Sim Racing Den. With those ideas in my pocket, my own adventure began: building a sim racing roof that not only looks sleek, but also contributes to that pure, authentic cockpit experience.
 6")
Why a Sim Racing Roof?
A sim racing roof is much more than a decorative element. It creates a real cockpit experience and helps you fully immerse yourself in the virtual racing world. It feels like being in an enclosed racing car: you see fewer distractions, hear the sound better and experience more focus.
Once I installed my roof, I immediately noticed:
- Sound effects, such as engine and tyre noises, came across more intensely.
- Light reflections and external influences were drastically reduced.
- I was able to completely cut myself off from my surroundings and dive deeper into the race.
Besides, it is an impressive sight. Everyone who sees my rig immediately asks about the roof and how I made it.
My Ultimate Desire for Realism and Immersion
For me, sim racing is not just about fast lap times, but the feeling of really being in that cockpit. A sim racing roof plays into that, just like a wind simulator or sim racing safety nets, a key role. It enhances the illusion that you are surrounded by a real race car, blurring the line between virtual and reality.
The effect is unprecedented: you cut yourself off from the outside world, eliminate distractions and create a focus you normally only experience on the track. You hear every detail - from the screeching of the tyres to the hum of the engine - even more intensely. And with less incident light, your visual experience becomes pure and undisturbed. The result? Deeper engagement, better performance and that addictive feeling of being completely immersed in the race.
Aesthetics and Pride
But there is more than just functionality. A sim racing roof also gives your setup a hefty dose of appearance. It transforms your rig from 'just good' to a cockpit you are proud to step into. It shows that you have not just put up a wheel and pedals, but that you have worked on your racing environment with an eye for detail and passion. Friends, family and fellow sim racers are guaranteed to pause for a moment when they see that sleek roof. It's the kind of upgrade that exudes dedication - and that satisfaction, you'll feel every time you sit down for a race.
What do you need to make a Sim Racing Roof?
To make a sim racing roof, various materials and tools are needed to create a sturdy and functional structure. Here are the basic supplies you might consider:
- Cardboard: When creating a sim racing roof, cardboard is often an indispensable tool to create a mould and shape. Cardboard is a versatile and easily machined material that helps you visualise and test the final design of your roof.
- Tape and cutting tools: Provide some duck tape and a good pair of scissors and Stanley knife to cut the cardboard into the right shape.
- Measuring tools: A tape measure, pencil and possibly a shop hook to take accurate measurements and mark cuts.
- MDF board: These boards are used to form the roof surface. MDF (Medium-Density Fiberboard) is often a popular choice because of its smooth finish and easy machinability.
- Power tools: A circular saw, drill and sander to cut the wood to size, drill holes and smooth the edges.
- Paint and finishing: To make the roof aesthetically pleasing, you can paint it in the desired colour and finish it with varnish. Like me, you can also choose to cover the MDF board with a Carbon Wrap Vinyl Film and an adhesive glossy wrap film.
- Fastening materials: When building a sim racing roof, choosing the right fasteners is very important to ensure that the roof is securely and safely attached to your sim racing setup. What you need for this depends on your design choice and how you want to attach it. Screws, bolts, nuts and washers are essential in this project. Tip: make use of a TV bracket or montage material. In many cases, this is very suitable for this project.
- Personal Protective Equipment: Safety always comes first! Therefore, make sure safety glasses, hearing protection and possibly gloves during the construction process.
Keep in mind that the exact supplies may vary depending on your design, the size of your setup and your personal preferences. It is always a good idea to do thorough research and possibly seek advice from other sim racers who already have experience building a roof for their setup.
Sim Racing Roof Making in 9 Steps
This is when it gets really fun. From here, I take you step by step through building your own sim racing roof - exactly as I did it myself. Whether you're chasing that ultimate, realistic cockpit experience or just fancy a challenging project to give your rig that extra edge, this guide will get you there. Not a dry list, but a practical and enthusiastic account of how to go from idea to a sleek, custom-made roof that completes your setup. Let's dive in!
Step 1: Research and planning
When creating a sim racing roof, the first step is to conduct thorough research and create a thorough plan. Start by exploring different types of sim racing roofs to understand what options are available and which ones best suit your needs and desires. Take the time to understand the pros and cons of each type of roof and how they can contribute to your simulator racing experience.
Think about the dimensions, shape, mounting, position of the monitors as well as other accessories that might be in sight. This first step took quite a long time with me to think everything out step by step and prepare on how to fix the roof.
Design goal:
- The design should be light, sturdy and strong
- The cost of the project should be at least
- The design should be simple, clean and effective.
With these requirements and goals in mind, I started looking for the perfect material to make my sim racing roof. As a result, I ended up with MDF. Also consider whether you want to make a cardboard mould to visually assess the design before proceeding with the final construction. This is to avoid mistakes and save costs.
Step 2: Creating a Mould and Prototype
If you have chosen to make a cardboard mould or prototype, you can now proceed with cutting the cardboard according to the design of the roof. Place the cardboard mould on your sim racing setup to check that the roof fits properly and that all components are in the right place. This allows you to test any adjustments before you start building the final roof.
 7")
 8")
Step 3: Create a Design
In this step, it is extremely important to make a thorough plan for the design of your roof. Use Photoshop or another available (free) design tool to create different layouts. Below you can see some of the designs I created. In step 6, you will continue with the design.
 9")
 10")
 11")
Step 4: Collecting materials
With the design in place, it's time to gather everything you need. Think MDF boards, screws, bolts, nuts and other fasteners, but also the right tools: a saw, drill, sander and measuring tools. Make sure you have everything ready before you start, so you can work through later in one go.
For my project, I chose a 6 mm thick MDF board from the local hardware store. An alternative is foam board - super light and easy to work with - but it did not meet my requirements. In my case, it needed to be sturdy enough to support my Philips Hue Play bulbs, and that's where foam board falls short.
Tip: Use one large MDF board and cut it to size. Avoid several separate boards; a one-piece roof is sturdier and looks tighter.
My triple monitor setup is about 120 cm wide, so I deliberately took a few extra centimetres. The depth of the monitors and chair is about 110 cm. I ended up having the board cut to size at the hardware store to 110 x 125 cm.
Step 5: Tailoring the roof
Now the real work begins: making the roof surface. Lay your jig on the MDF board and accurately draw with pencil the lines of the corners and edges you want to cut. Use a crosscut saw or circular saw to quietly and precisely cut out the shape. Take the time to sand all edges smoothly to give the whole thing a neat and secure finish.
If you have aligned everything properly, the jig and the MDF board should now match exactly. Then fasten the board securely to the wooden frame with suitable screws and bolts. Make sure everything is fastened evenly for a stable roof surface that you can use without worry during your racing sessions.
 12")
Step 6: Finishing touch and aesthetics
With the roof surface and any accessories in place, it's time for the finishing touches - the moment when your project really comes to life. Start by sanding the entire surface smooth to eliminate rough edges and create a clean base. Then you can choose paint in a colour of your choice, or apply a protective finishing coat to protect the wood from slijtage.
I personally chose a carbon wrap vinyl film combined with a self-adhesive black glossy film. This combination gives a professional, high-end look and is surprisingly easy to apply. The film is elastic, easily adjustable and adheres firmly. Unsure about the technique? There are plenty of helpful videos on YouTube showing step by step how to apply it neatly.
 13")
Step 7: Attaching the mounting brackets
With the roof now fully finished and with a sleek vinyl wrap, it's time to install the montage brackets. How you go about this depends entirely on your rig, the space available and the materials you have at your disposal - so think carefully about the most sturdy as well as practical fixing method for your situation. A poor fixation can not only make the roof unstable, but also stress the rest of your setup.
To prevent sagging, I chose two L-shaped iron profiles as additional reinforcement under the MDF board. These profiles give the whole thing a solid base and ensure that the roof keeps its shape for years. After carefully cutting the profiles to size, I drilled the necessary holes and attached them firmly to the structure with robust bolts and washers. This immediately gave noticeable extra rigidity.
My sim rig is in the attic, under a sloping roof, which limited my options considerably. It took some creative thinking to find a solution that was both stable and practical. In the end, I decided to use the wooden support beams as a solid attachment point. This approach not only provided stability, but also made the best use of the available space and ensured that the roof was perfectly aligned with my setup.
 14")
Step 8: Roof Fixing and Optimisation
Once the roof was in place, I soon discovered a new challenge: getting in and out didn't exactly get any easier. The construction combined with my monitors made the passage to the cockpit so tight that I literally had to squeeze myself in between. That was far from ideal for quick boarding during a race event or a long training session.
To address this problem, I decided to mount sturdy hinges to the iron profiles and add a pulley system. With this, I could easily lift the roof up, creating more space to get in and out comfortably. This was already a huge improvement and immediately made the rig feel much more comfortable to use.
Yet I remained critical of the construction. I wanted a solution that was not only practical, but also even more stable and durable. In the end, I chose to replace the pulley system with two solid vertical profiles next to my chair. These profiles carry the weight of the roof and give the whole thing a more robust base. The result was not only a much stiffer construction, but also a visually sleeker whole that perfectly matched the design of my cockpit. This makes the whole thing feel like it has always been designed that way - functional, stable ánd stylish.
 15")
 16")
Smart Solution for Weight and Positioning
While lifting the roof significantly improved access to my rig, it also brought a new challenge: the roof was simply too heavy to rest on the monitors without risk of damage. I wanted the roof to 'float' at the right height and remain stable in position without stressing my equipment. A gas spring initially seemed an elegant solution, but proved technically unfeasible in my situation.
After some experimentation, I found a surprisingly simple yet effective approach: a rope with an old-fashioned trolly. I drilled two strategic holes in the roof and firmly attached the trolly to the ceiling joist. This way, with one simple movement - by pulling the rope - I could smoothly lift the roof and secure it at the desired height. This suddenly made getting in and out a breeze, without compromising stability.
This smart, affordable and practical solution not only made my sim racing roof more user-friendly, but also more sustainable in the long run. It required creative thinking and abandoning standard solutions, but the result is a visually clean, stable and functional roof that perfectly fits my sim racing setup.
Step 9: Final montage
The final step is all about completing the project firmly and safely. Check that all screws, bolts and fasteners are tight and that the roof is stable. Only when everything is solid and reliable can you really consider it completed.
After that, enjoy: your sim racing roof is ready. The result is impressive - more realism, more immersion and a setup that looks sleek. For me, it's an upgrade I'm proud to look at and that takes every racing session to the next level. And be honest; hasn't it turned out fantastically beautiful?
Update:
I wasn't entirely happy with the previous setup after all. The Philips Hue Play lights were not optimally attached and the solution with the rope and pulley did not feel ideal. To create a sturdier structure and a more authentic cockpit feel, I placed two vertical profiles next to my Sim Lab Seat on which the roof rests.
 17")
I also switched from two to eventually four Philips Hue Play lights. This made the montage slightly more complex, but also presented a great opportunity: I decided to integrate the lights directly into the roof. The result is not only practical and sleek, but also something I am immensely proud of. The images actually say it all.
 18")
 19")
 20")
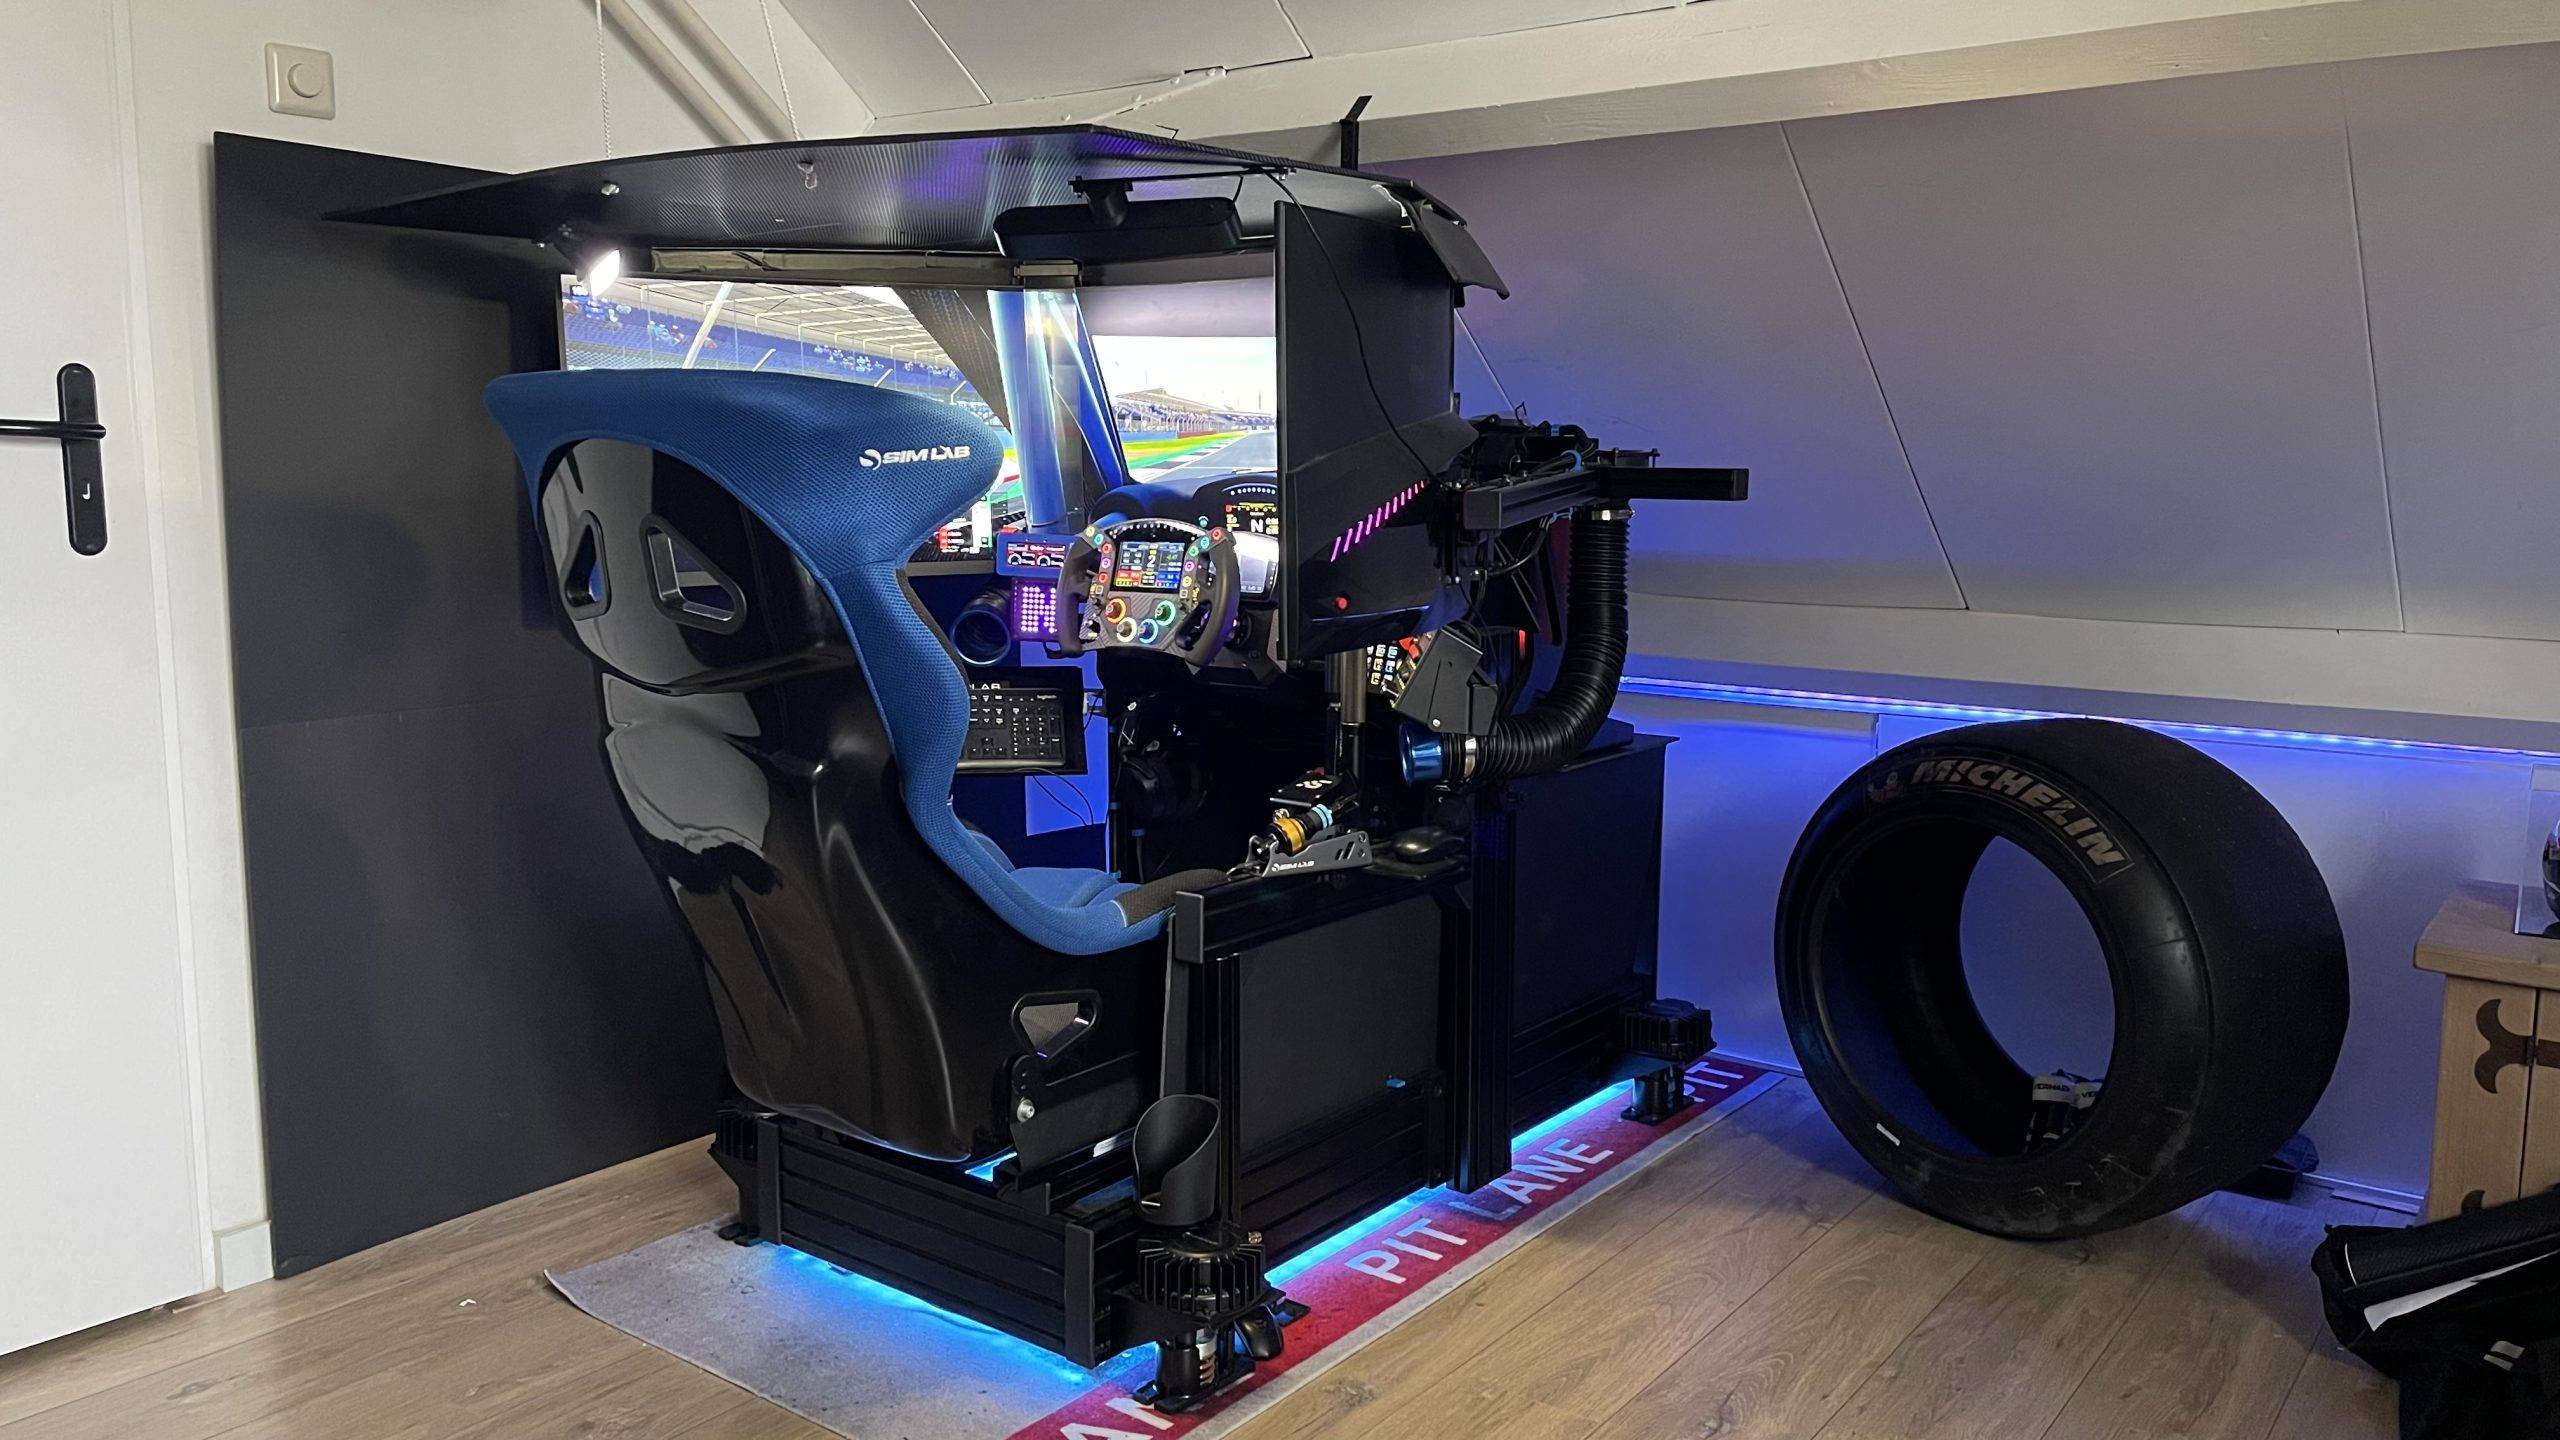
My Sim Racing Roof: The Final Result
 21")
Conclusion: Create Your Own Sim Racing Roof
Building your own sim racing roof is great fun, bringing together creativity and precision to deliver a unique racing experience. By carefully following the steps, from research and planning to attaching accessories, you have had the opportunity to design and build a roof that is not only visually appealing, but also functional and ergonomically sound.
Whether you are a casual gamer or a dedicated sim racer, your new sim racing roof adds a new dimension of realism and fun. I found it one of the more fun projects I have done and it is one I am immensely proud of. It is a solution unique to my simulator and what makes my racing experience even more intense and beautiful!
Finally, I hope I was able to inspire you with this and get you started. And of course, I am very curious about your results. So share your home-made sim racing roof on social media and tag us at instagram!

More DIY Sim Racing Projects
I absolutely adore gifted sim racing DIY projects. There is something satisfying about creating and customising your sim setup yourself to achieve an even more immersive experience and add even more experience and realism. Do you like this too? Then get inspired and be sure to check out the DIY projects below:
- DIY: This is how to make your own simflag flag spotter
- DIY sim rig building? Here are the pros and cons!
- Here's how to build a Sim Racing Wind Simulator!
- Make Your Own DIY Button Box In These 8 Simple Steps!
- Easily build your DIY Sim Racing Wheel with the Pokornyi Engineering HYP-R DIY Files. Here's how!
- Sim Rig Ideas: Discover The Magic Of Foam Board!
Also check out Pokornyi Engineering's digital DIY files and build your own button box and steering wheel!
Have any thoughts?
Share your reaction or leave a quick response — we’d love to hear what you think!
-
 0
0
-
0
-
0
-
0
-
0
-
0


