Not long ago, I teamed up with Pokornyi Engineering announced an exciting collaboration, stemming from our shared passion for (DIY) DIY sim-racing projects. As a renowned manufacturer of high-quality DIY kits, the Pokornyi Engineering proved itself a true pioneer in this industry. Now it is finally time to take our collaboration to a new and higher level by building and thoroughly testing Pokornyi Engineering's products ourselves! In this article, we will take you step-by-step through building our first DIY sim racing wheel: the Pokornyi Engineering HYP-R.
The result? A stunning creation! Building a hypercar DIY sim racing wheel yourself turned out to be not only easier than expected, but also a hugely enjoyable experience. Keep reading and discover step by step how you too can take on this challenge and create your own sim racing wheel. Discover the world of DIY sim racing and get inspired by our experience!
Pokornyi Engineering
Pokornyi Engineering (PE) first requires a brief introduction. PE is a company that specialises in designing and manufacturing high-quality do-it-yourself (DIY) kits and components for sim racing. They are known for their innovative approach and the quality of their products, which cater to the sim racing community. Pokornyi Engineering offers a range of products designed to enhance the racing experience by adding realism and precision to simulators.
Their range often includes detailed building kits for sim racing handlebars and button boxes. These kits are designed for enthusiastic DIYers in the sim racing world who want to customise and optimise their setup. What characterises Pokornyi Engineering is their attention to detail, using high-quality materials such as CNC-milled aluminium, carbon fibre and advanced electronic components.

Pokornyi Engineering HYP-R
One of their most notable and popular products is the Pokornyi Engineering HYP-R, a kit for building an advanced sim racing wheel known for its quality and customisability. The HYP-R is designed for both beginners and experienced users who want to take their sim racing experience to the next level.
The Pokornyi Engineering HYP-R is a true masterpiece in the world of do-it-yourself sim racing. This hypercar steering wheel is designed with attention to detail and precision, providing an unparalleled experience for both novice and experienced sim racers. Its advanced design includes high-quality materials and integrated technology which ensures a realistic and immersive feel while racing.
Innovation and functionalities
With its customisable buttons and ergonomic design, the HYP-R is not only pleasing to the eye, but also highly functional. The construction process has been carefully structured so that even those with limited technical knowledge can take on the challenge of building this steering wheel themselves. The HYP-R therefore symbolises the innovation and quality that Pokornyi Engineering is known for, and is an indispensable component for any sim racing setup.


Specifications Pokornyi Engineering HYP-R
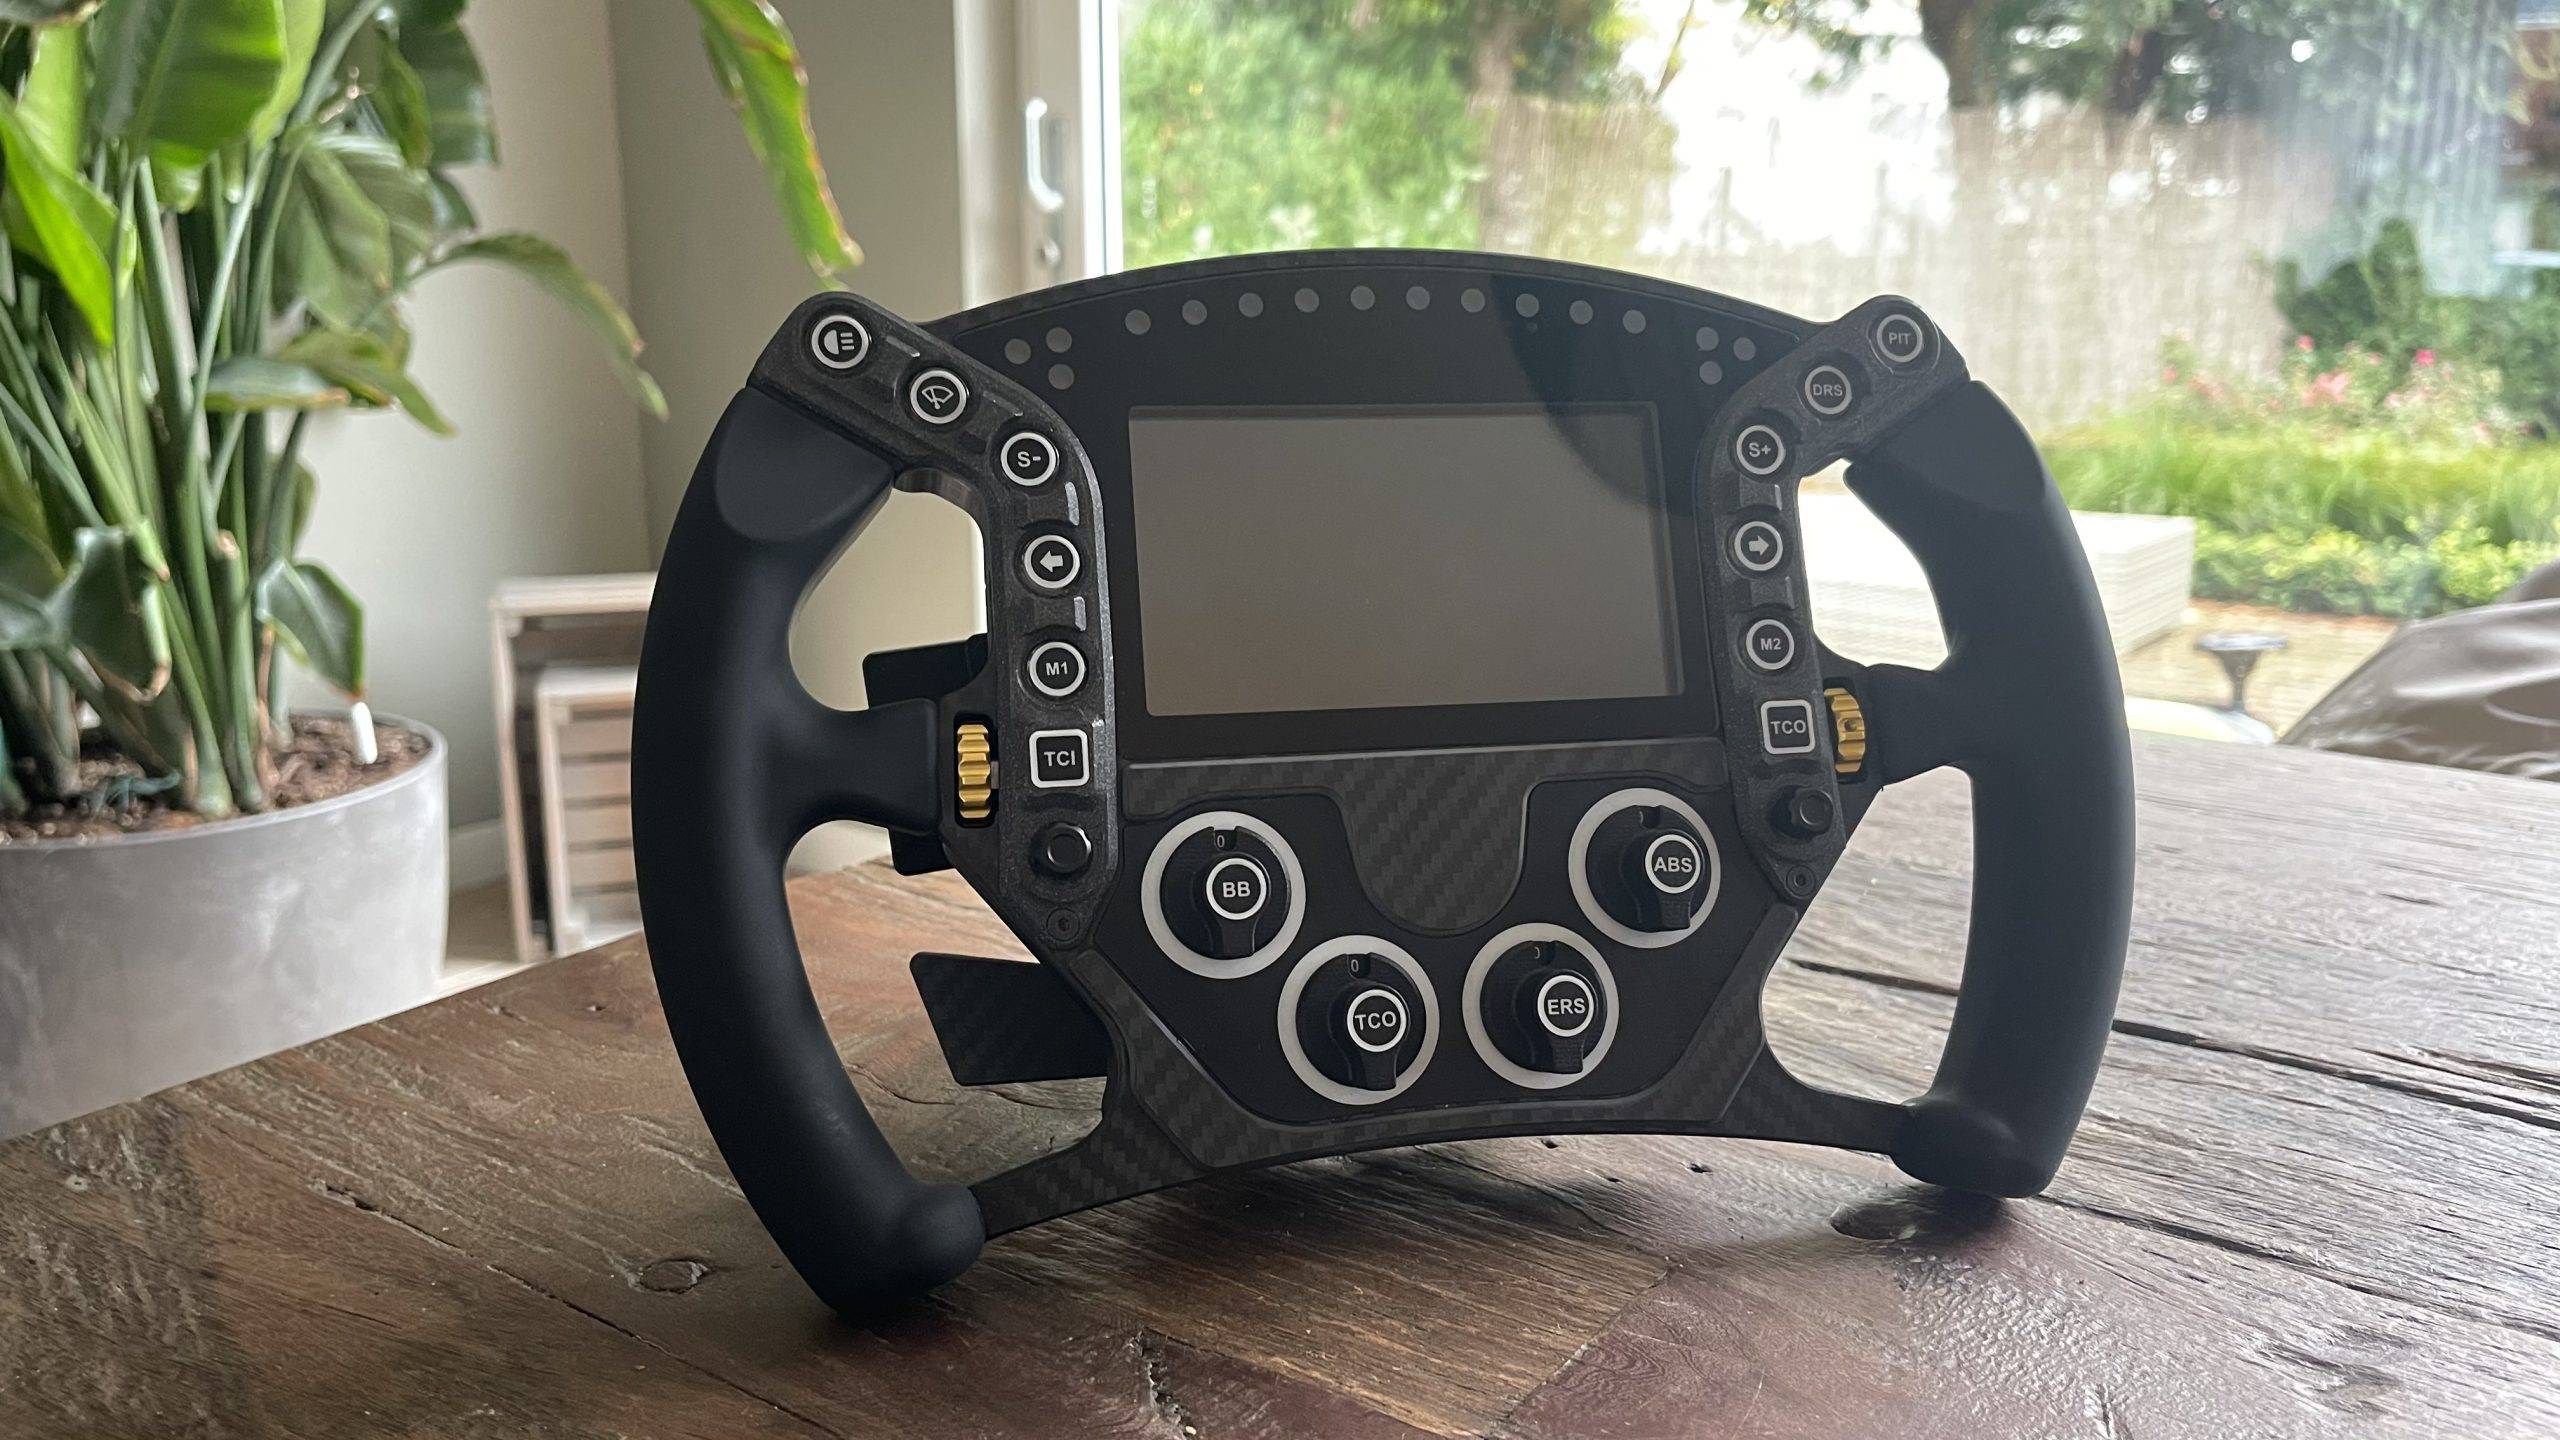
Pokornyi Engineering's HYP-R is a top-of-the-range sim racing wheel, excelling in both design and functionality. This steering wheel is characterised by a solid plastic structure and a carbon fibre finish. This combination of high-quality materials, advanced technology and attention to detail makes the HYP-R a must-have for any serious sim racer looking for a realistic and immersive driving experience. The ergonomic grips ensure comfort and a firm grip during intense racing sessions. In terms of features, the HYP-R offers a plethora of input options:
- 12 RGB-lit front buttons
- 2 seven-way funky switches
- 2 magnetic gearshift paddles
- 2 optional extra flippers
- 2 back buttons
- 2 side-turn encoders
- 4 front rotary coders with RGB lighting
Bovendien is het uitgerust met een Hall sensor koppelingspaddle-systeem met dubbele koppeling functie, waarbij het bijtpunt verstelbaar is. Het stuurwiel bevat ook 16 RGB-LED’s die de visuele ervaring verrijken. Een opvallend kenmerk is het 5-inch 800×480 VoCore LCD-scherm, dat een heldere en gedetailleerde weergave biedt van cruciale race-informatie. Dit display heeft een verfrissingsfrequentie van 24 fps en een actief gebied van 109,65 mm bij 61,63 mm.
Measuring 295 mm in diameter, the HYP-R is compatible with a 70 mm PCD quick-release system and attaches with 6x M5 screws. The wheel is designed for use with a USB 2.0 connection and requires a typical supply voltage of 5.0 V with a current consumption of 2.0 A. It is therefore essential to use it with a USB port of at least 2.0 A.
What will it cost to build the Pokornyi Engineering HYP-R?
The final price for assembling the Pokornyi Engineering HYP-R depends heavily on both the quality and origin of the materials chosen. For this project, you should expect costs to be range between €450 and €600. For example, by choosing cheaper, lower-quality 3D printed parts, you can save quite a bit on your budget. However, it is crucial to think about how such choices will ultimately affect the performance and lifespan of your HYP-R.
DIY Sim Racing Wheel Making
Time to start building! The steps below are a good indication of what to expect when you start this project. Of course, this depends on your experience, knowledge, whether or not you do your own printing and whether or not you buy a lot of ready-made products.
Assembly Video
Tip: Bekijk ook eens onderstaande video waarin ik de HYP-R in elkaar zet. Ik moet eerlijk toegeven dat dit niet m’n beste video is en verre van de kwaliteit die ik voor ogen had, maar ik hoop dat je er wat aan hebt 🙂 Ow ja, vergeet je niet te subscribe op m’n YouTube kanaal!

Step 1: Preparation
Of course, the first step is obvious. Before you begin this exciting DIY project, it is necessary to purchase the digital DIY files and research all the materials needed. These digital files are essential for the building process and are available for €45. With this purchase, you will receive:
- A comprehensive and detailed manual,
- All necessary 3D files,
- A Bill of Materials (BOM) list,
- Decals and Stickers,
- Glass Panel design,
- Sim Hub Profiles.
These resources are crucial for successfully putting together your own HYP-R and ensure that you are well prepared to embark on this project.
Planning and Research
Kies je ervoor om – goedkopere – onderdelen te kopen van bijvoorbeeld AliExpress, houdt dan rekening met langere levertijden. Controleer alle bestelde onderdelen goed en vink deze af in de BOM-lijst. Tip: schroeven en bouten heb je nooit teveel en raak je ook snel kwijt. Zorg altijd dus voor een gezonde hoeveelheid extra voorraad om frustratie tijdens het bouwen te voorkomen. Niets is zo vervelend als je aan het bouwen beent en je komt erachter dat je te weinig onderdelen hebt. Zorg ervoor dat je de handleiding goed leest voordat je begint met bouwen.
Step 2: Collect All Parts
Depending on your level and experience with do-it-yourself projects, you may choose, for example, the PCB (Printed Circuit Board) at Pokornyi Engineering buy ready-made (this costs €129 excl. VAT) or, for the really hardcore DIYers, can be assembled all by yourself. Do you have a 3D printer at home? Then you can easily print all the parts yourself. Bear in mind that this process may take some time. Prefer printing-on-demand? The manual clearly outlines the required specifications.
Want to save time and guarantee quality? Then buy some parts directly from Pokornyi Engineering. Many materials including the glass, decals, CNC-milled carbon set With silicon moulded handles decoders, button caps and more are for sale directly from Pokornyi Engineering. As far as I am concerned, it is absolutely recommended to buy these materials directly from PE. By doing so, you are assured of quality, the right parts ánd you support Pokornyi Engineering for their great work. Once you have collected all the parts, it will look something like this.


Step 3: Assembly of the Shifters and Clutch
Now that we have all the parts complete, it's time to start building! And I can tell you in advance; this is much more fun than you think! It feels like engineering Lego for adults 😉
The first step is to assemble the shifters and clutch. Press the threaded inserts into the holes of the body with a ~250°C soldering iron. Then attach the microswitch with the socket head screws. It is recommended to solder a 2-pole cable with an XH2.54 connector to the microswitch before mounting it. Always protect the solder joints with heat-shrink tubing. Then attach the N50 magnets and the carbon shifter plates.
Het proces voor het monteren van de koppeling lijkt sterk op dat van de andere onderdelen. Het is belangrijk om aandacht te besteden aan het correct vastlijmen van de hall-sensor bij de koppelingspedalen en ervoor te zorgen dat de te solderen kabels overeenkomen met de volgorde op de printplaat. Alle benodigde informatie hiervoor is duidelijk beschreven in het hoofdstuk ‘Bekabeling’. Ik raad aan dit hoofdstuk zorgvuldig door te lezen en meerdere keren te controleren. De handleiding is erg duidelijk en eenvoudig te volgen. Als je deze stap hebt afgerond, zou het er zo uit moeten zien 🙂


For now, you can put aside the shifter and clutch paddles you made. We will only need these again later in step 4.
Step 4: Preparing the casing
It is time to assemble the main enclosure. We start by placing inserts in the housing. These small inserts are needed to screw everything down properly later. Here again, use the soldering iron to push the inserts into the holes. Once these are up to temperature just push them in. Be careful not to melt the plastic. Next, we attach the carbon fibre plate to the outside of the housing. We do this with the 12 M3x10mm screws.


Placing knobs and rotary knobs
Now that we have assembled the housing and core of the Pokornyi Engineering HYP-R, it is time to install the buttons and encoders. We start with the two push buttons on the back. First solder the wires before mounting them. Then attach the M8 pushbuttons to the backplate and tighten them well to prevent them from coming loose when in use.
The procedure for installing the two encoders is similar. First, solder the three wires as indicated in the manual. Next, place the encoders in the correct position and tighten the nuts firmly to prevent them from moving. Cut off the two top pins to prevent future damage to the circuit board; they are no longer needed.


Add Last Parts
As a concluding step, we attach the USB connector and a spacer hub to the back of the panel. This spacer is crucial for the montage of, for example, your Fanatec Podium Hub, so that it does not interfere with the shifter paddles and clutch.
Fit the 4-pin GX12 connector and make sure you solder the cables correctly. The colours of the JST cable may differ. Carefully check the order on the board and solder the wires to the GX12 connector. This step is crucial, so it is important to do this carefully. Make sure the cable is not too long, this can cause problems with the connection. In fact, this cable should not be longer than 10 cm and the D+/D- wires should be twisted. In all honesty, I found this step, and soldering these cables, the most challenging part of the whole process.
Finally, we install the shifters and additional paddles, which are indispensable for controlling the device. Once these steps are complete, the housing of our homemade sim racing wheel is completely finished and extremely robust!


Step 5: PCB connection and assembly
In my case, I chose a ready-made HYP-R PCB . Would you rather do this step yourself? You can! The manual explains in detail how to do this and what is needed for this. In this step, I will assume for a moment that the PCB is ready, whether you made it yourself or bought it from PE.
Vocore Screen Attach
Voordat we de PCB aansluiten gaan we het 5″ Vocore Display bevestigen. Gelukkig is dit super eenvoudig en stelt dit weinig voor. Lijm allereerst de Display Spacer met dubbelzijdige tape onder de discplay driver. Dit onderdeel is nodig om voldoende ruimte te behouden voor de micro USB-connector. Vervolgens lijm je het Vocore scherm op de printplaat met dubbelzijdige tape. Op de printplaat staat duidelijk aangegeven waar je het beeldscherm moet plaatsen, dus hier kan niets mis gaan!


Components Connecting to PCB
Now that we have assembled all the components in the enclosure, it is time to connect them to the circuit board. Connect the GX12 USB connector, side encoders, rear push buttons, shifters and couplers to the board and place the board in the enclosure. Follow the instructions on the diagram below and connect all switches, encoders, VoCore Display and GX12 to the board.
Tip: tape the cables to the housing wherever possible and necessary. This will prevent the cables from sliding and unnecessarily sitting in front of the screw holes. This will prevent some frustration when attaching the front panel in the next step 😉

Circuit board mounting
Once you have connected everything correctly, place the circuit board on the enclosure. Make sure the circuit board is not on the wires and does not touch the pins of the GX12 connector, encoders and buttons. Place the light guides for the buttons on the PCB. The pins of the plastic parts should fall into the holes on the PCB. Then attach the rotatable light guides to the circuit board with four M3x8mm black Allen screws. Finally, secure the circuit board with ten M3x6mm black Allen screws and attach the transparent button caps.
The Pokornyi Engineering HYP-R steering wheel is coming to life more and more! And how beautiful it is already 🙂 Time for the next step!


Step 6: Assemble and attach front panel
The trickiest part is over! Now that the rear enclosure and circuit board are connected and placed in the enclosure, it is time to assemble the front panel. Again, you have the freedom to decide the level of difficulty and challenge. For those looking for more of a challenge, you can choose to make all the parts yourself or have them made. As with the circuit board, I recommend making the carbon front panel with silicone handles directly from Pokornyi Engineering. Nice and easy and with this you support Pokornyi Engineering.
Mounting Button Plates and Spacers
Monteer de geprinte ‘ButtonPlates’ op het front paneel met 4x M3x8mm zwarte inbusschroeven. Let er op dat je de schroeven niet te strak aandraait. Te strak aandraaien kan leiden tot beschadiging van de gaten. Monteer vervolgens de 7 afstandhouders op de voorplaat.


Mounting Stickers, Glass and Plexiglas
De volgende stap is het plaatsen van de vier ronde ‘RotaryInserts’ van plexiglas. Als je de RGB achtergrondverlichting wilt gebruik dan de acryt plexiglas of transparante geprinte onderdelen en leg deze in de voorkant van het front paneel met de ruwe kant naar boven. Bevestig vervolgens de sticker and glue the carbon cover parts to the handlebar front plate. This gives extra depth and a nicer finish.
Next, glue the carbon fibre cover parts to the front. If you didn't order these parts, you can skip this step. Finally, glue the glass in place with double-sided tape. If you have the glass at the Pokornyi Engineering Webshop purchased, the double-sided tape has already been applied to the glass.


Mounting front panel and buttons
Now that the front of the handlebar is ready, it's time to attach it to the housing. You do this with the 7 M4x10mm screws. When fitting, make sure the cables are not pinched or in the way. Be extremely careful in this to avoid any damage to the cables. I found this step frustrating in some cases and had to redo it several times.
Mounting Buttons and Stickers
Een van de laatste stappen is het monteren van alle knoppen aan de voorzijde. Monteer als eerste de vier draaiknoppen aan de voorzijde en gebruik indien nodig stelschroeven om de knoppen stevig vast te zetten. Vervolgens monteer je de ‘funky switch’-knoppen. Onthoud wel dat als je het stuur in de toekomst wilt demonteren je de knoppen eerst moet verwijderen 😉
The very last step is the finishing touch; decide on a layout for all the stickers and place the stickers on the ten transparent buttons, four rotary knobs and next to the two encoders. Should you ever want a different layout, you can move and change the buttons all to your liking.


And say honestly? Isn't the end result stunning! I can't say and conclude anything but that this has been a super fun and satisfying project, but more on that later.
Step 7: Testing and setting up SimHub
Now that all the buttons are fitted, we are officially done with the montage! Time to bring our HYP-R to life and test if all the buttons and functionalities work. When you connect the wheel to your computer, four USB devices appear: a USB hub, a Game Controller HID, a virtual COM port and the VoCore screen. The VoCore screen requires you to install a driver yourself, but the other devices are automatically recognised and installed.
Je ziet de knoppen en andere bedieningselementen van het stuur op je computer als een standaard ‘USB Game Controller‘. Ga naar ‘Configuratiescherm’, kies ‘Apparaten en Printers’, en vind daar je controller. Met een rechtermuisklik op de controller en dan ‘Game Controller-instellingen’ kun je de invoer van het stuur bekijken. Kies de PE HYP-R en klik op ‘Eigenschappen’ om de invoer te zien. Test vervolgens of alle knippen werken. Let op! Het ingebouwde ‘eigenschappen’-paneel in Windows kan slechts 32 invoeren tonen. Ondanks dat je ze niet kunt zien, werken de overige knoppen en invoeren ook prima! Schrik dus niet als de knoppen niet oplichten 😉
SimHub Installation
Voor de display en LED’s van je Pokornyi Engineering HYP-R steering wheel heb je SimHub needed. This is a powerful programme that allows you to add external hardware to your simulator from dashboards, wind simulators to bass shakers. The programme is modular and has some limitations in free mode, such as a limit of 10 FPS. You can support the creator and buy a licence for a few euros!
Om het VoCore-display te gebruiken, moet je eerst de drivers installeren. Deze zijn te vinden op de website van SimHub. Je kunt bestaande dashboards installeren en importeren in de SimHub-bibliotheek. Voor het configureren van je VoCore-display, ga naar ‘Dash Studio’ en selecteer VOCORE. Zorg dat je het display inschakelt en kies een dashboard om te gebruiken. Je kunt dashboards aanpassen of zelfs nieuwe maken.


Voor het instellen van je RGB LED’s, ga naar het Arduino-menu, selecteer de RGB LED’s-tab en klik op ‘Profielenbeheer’. Je kunt hier aangepaste LED-profielen importeren. Als SimHub je HYP-R stuur niet automatisch detecteert, controleer dan de verbinding tussen je stuur en de PC. Als alles werkt (knoppen, display), maar de LED’s niet, controleer dan of een ander programma de COM-poort gebruikt. Soms gebruiken willekeurige programma’s, zoals een slicer voor een 3D-printer, willekeurige seriële poorten.
The Final Result Of Our DIY Sim Racing Wheel
The end result of the DIY sim racing wheel is simply phenomenal! The beauty and sophistication of the design exceed all expectations. Pokornyi Engineering's DIY files are exceptionally well organised and make the whole process very accessible. Everything is described clearly and in detail in the comprehensive manual and all files are neatly organised. By carefully reading the manual and working accurately, anyone, regardless of technical skills or background, can successfully complete these projects. It is really impressive how accessible these manuals are, even for beginners. And all for
The beauty of these projects is that you can control the complexity. If you choose to make everything yourself, it can be a time-consuming challenge, but that only adds to the satisfaction when you see the end result. Whether you have a beginner are or someone with more experience in DIY projects, Pokornyi Engineering's manuals offer the perfect balance between clarity and depth. This ensures that the project is accessible to everyone, and the end result is all the more beautiful because of the effort and dedication put into it.


This experience of building my own sim racing wheel was incredibly enjoyable. It was a fantastic engineering challenge and an incredibly fun experience. The satisfaction of seeing and feeling the finished product is indescribable. I highly recommend this project to anyone with a passion for sim racing. It is a unique opportunity to put your skills to the test while creating something truly unique and new.
The whole experience was so much fun, I can hardly wait to start more sim racing DIY projects. For anyone interested in similar projects, I recommend the Pokornyi Engineering website check out for all their insane products. Their range is sure to inspire exciting new DIY challenges in the world of sim racing.
Conclusion

Pokornyi Engineering HYP-R
“Een Absolute Aanrader!”
The Pokornyi Engineering HYP-R is a top-of-the-range sim racing wheel. It combines stylish design with advanced features for a realistic racing experience. The HYP-R is perfect for both beginners and experienced builders. The result is a professional and durable racing wheel and a must-have for any sim racer.
In the video below, you can see how I test the Pokornyi Engineering HYP-R to the limit in my simulator. It is amazing how every detail contributes to superior quality and an unparalleled experience. Don't forget us liking and subscribing on YouTube! My thanks are great 🙂

Do You Like Our Content? Then Make a Voluntary Donation
Do you like our content? Then make a voluntary donation as a token of appreciation. With these donations, we can create even more quality content for you. We are a platform by and for sim racers. My thanks!
Make a one-time donation
Your contribution is appreciated.
DonateMake a monthly donation
Your contribution is appreciated.
Donate monthlyMake a yearly donation
Your contribution is appreciated.
Donate yearlyAlso check our other DIY projects!
Hopefully I was able to inspire you with this article. Now if you want more inspiration for fun sim racing DIY projects? Then take a look at the articles below.
- Make Your Own DIY Button Box In These 8 Simple Steps!
- Building a DIY Sim Racing Roof: This is how you do it! (9 Steps)
- DIY: This is how to make your own simflag flag spotter
- Sim Rig Ideas: Discover The Magic Of Foam Board!
- Here's how to build a Sim Racing Wind Simulator!
- DIY Sim Rig Building? These Are the Pros and Cons!
Have any thoughts?
Share your reaction or leave a quick response - we'd love to hear what you think!
-
 0
0
-
0
-
0
-
0
-
0
-
0


